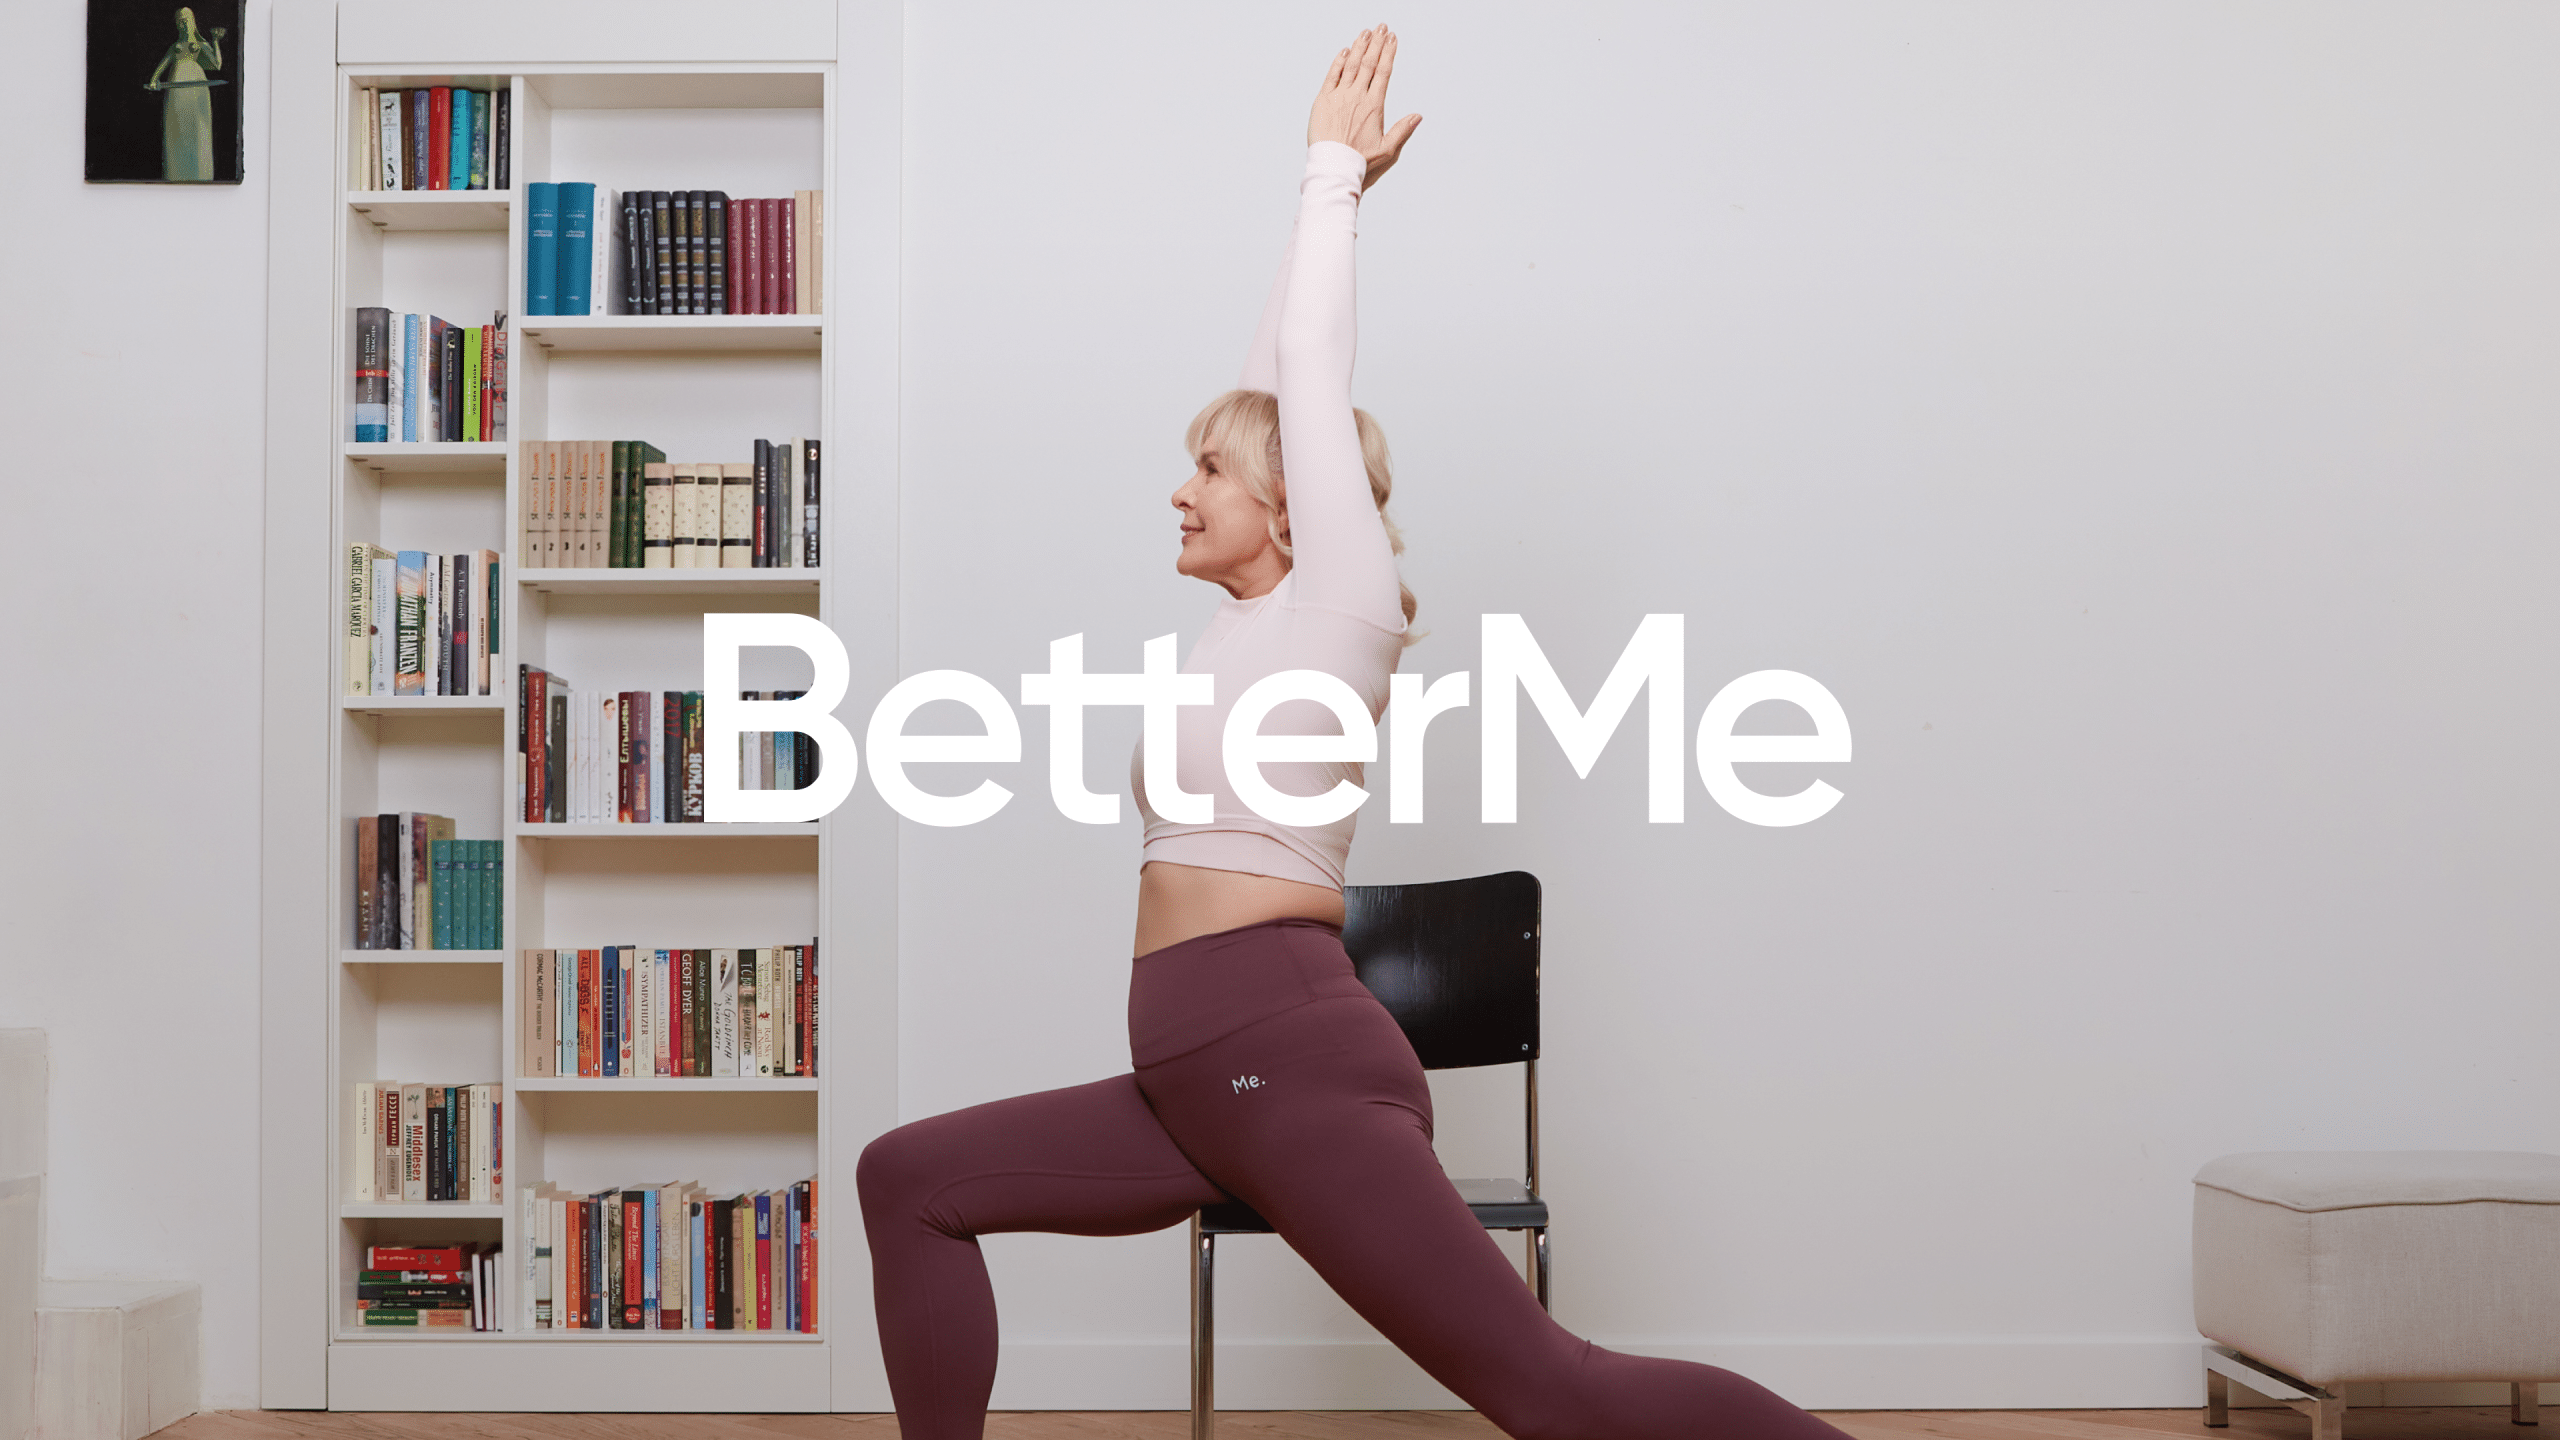
Not everyone has dumbbells at home to build their strength. But there is one thing in every house that could help improve strength – that is a chair.
Yes, you heard it right!
The chair that sits at your dining table or that seat that’s only used to pile the laundry on, can become useful gym equipment. You only need to learn how to perform the right moves and keep your body in the correct position. Chair dips are a bodyweight exercise that is quite simple, functional, and effective. They target the muscles at the back of your upper arms, while also targeting your shoulders, pecs, and some muscles on your ribs (2).
A chair yoga dip is one of the exercises that builds strength in a different form than the common exercises performed in a gym. This article highlights the benefits of chair dips, their variations, and how to do them right. Let’s find out how to dip!
What Are the Benefits of Chair Dips?
Chair dips are also called tricep dips because they target the muscles at the back of your upper arms. The triceps muscle is actually three muscles at the back of your upper arm. Its main function is to extend your elbow and straighten your arm (1). Training this muscle group has a number of benefits. It is an aesthetic muscle group that can make the appearance of your arms look bigger when you also combine training of your biceps. This muscle group also is important to train in order to keep your arm muscles balanced. It is also involved in many simple tasks, such as pushing a door open or pushing on a grocery cart.
There are many health benefits associated with tricep dips. Because this exercise has functional movement benefits, it can even be added to chair exercises for seniors to keep their training effective and versatile. In addition, when you exercise, you may notice a reduction in shoulder tension (5).
One chair yoga dip benefit is weight loss. Although it isn’t the sole exercise that can help you shed those extra pounds, you can include it in your exercise routine to create a larger total caloric burn. This movement increases your heart rate and eventually enables you to burn calories.
The triceps are quite important in our daily movements, and they involve extending the elbow. You must use these when opening a door, holding grocery bags, or when reaching for items on an overhead shelf. This muscle also plays a role in stabilizing your shoulder joints (4). When thinking of the muscles worked during a chair yoga dip with bent knees, you should know about the following three muscles:
- Trapezius: This muscle is shaped like a huge trapezoid and covers the back of your neck, shoulder, and upper back.
- Pectoralis Major: This is the larger muscle on the upper part of your chest. The pectoralis major and pectoralis minor make up the chest and are often referred to as your “pecs”.
- Serratus Anterior: This muscle covers the top eight or nine ribs on the side of your chest. It is critical for breathing and stabilizing your shoulder blade.
Note that the triceps also help you in some sports activities. Think of any upper body pushing movements. The triceps aid in the extension of the elbow and this occurs frequently in a sport like basketball. Whether you are shooting the ball or making a pass across the court, the triceps are critical.
BetterMe app will provide you with a host of fat-frying fitness routines that’ll scare the extra pounds away and turn your body into a masterpiece! Get your life moving in the right direction with BetterMe!
What is a Bent Knee Tricep Dip?
There are two different ways to perform chair dips. If you are a beginner, you should do it with bent knees. And once you feel strong enough, you can move to dips with straight legs. Below, we have explained the steps on how to perform a chair yoga dip with bent knees and then eventually how to move to straight leg dips as you progress over time.
Here are some steps to do chair dips and chair yoga dips with bent knees. Start with the basic exercise and gradually learn the advanced moves to build strength. The list below will start off with the basic exercise and then continue to progress into more advanced exercises. The tricep dip with rings would be the most advanced version of a tricep dip.
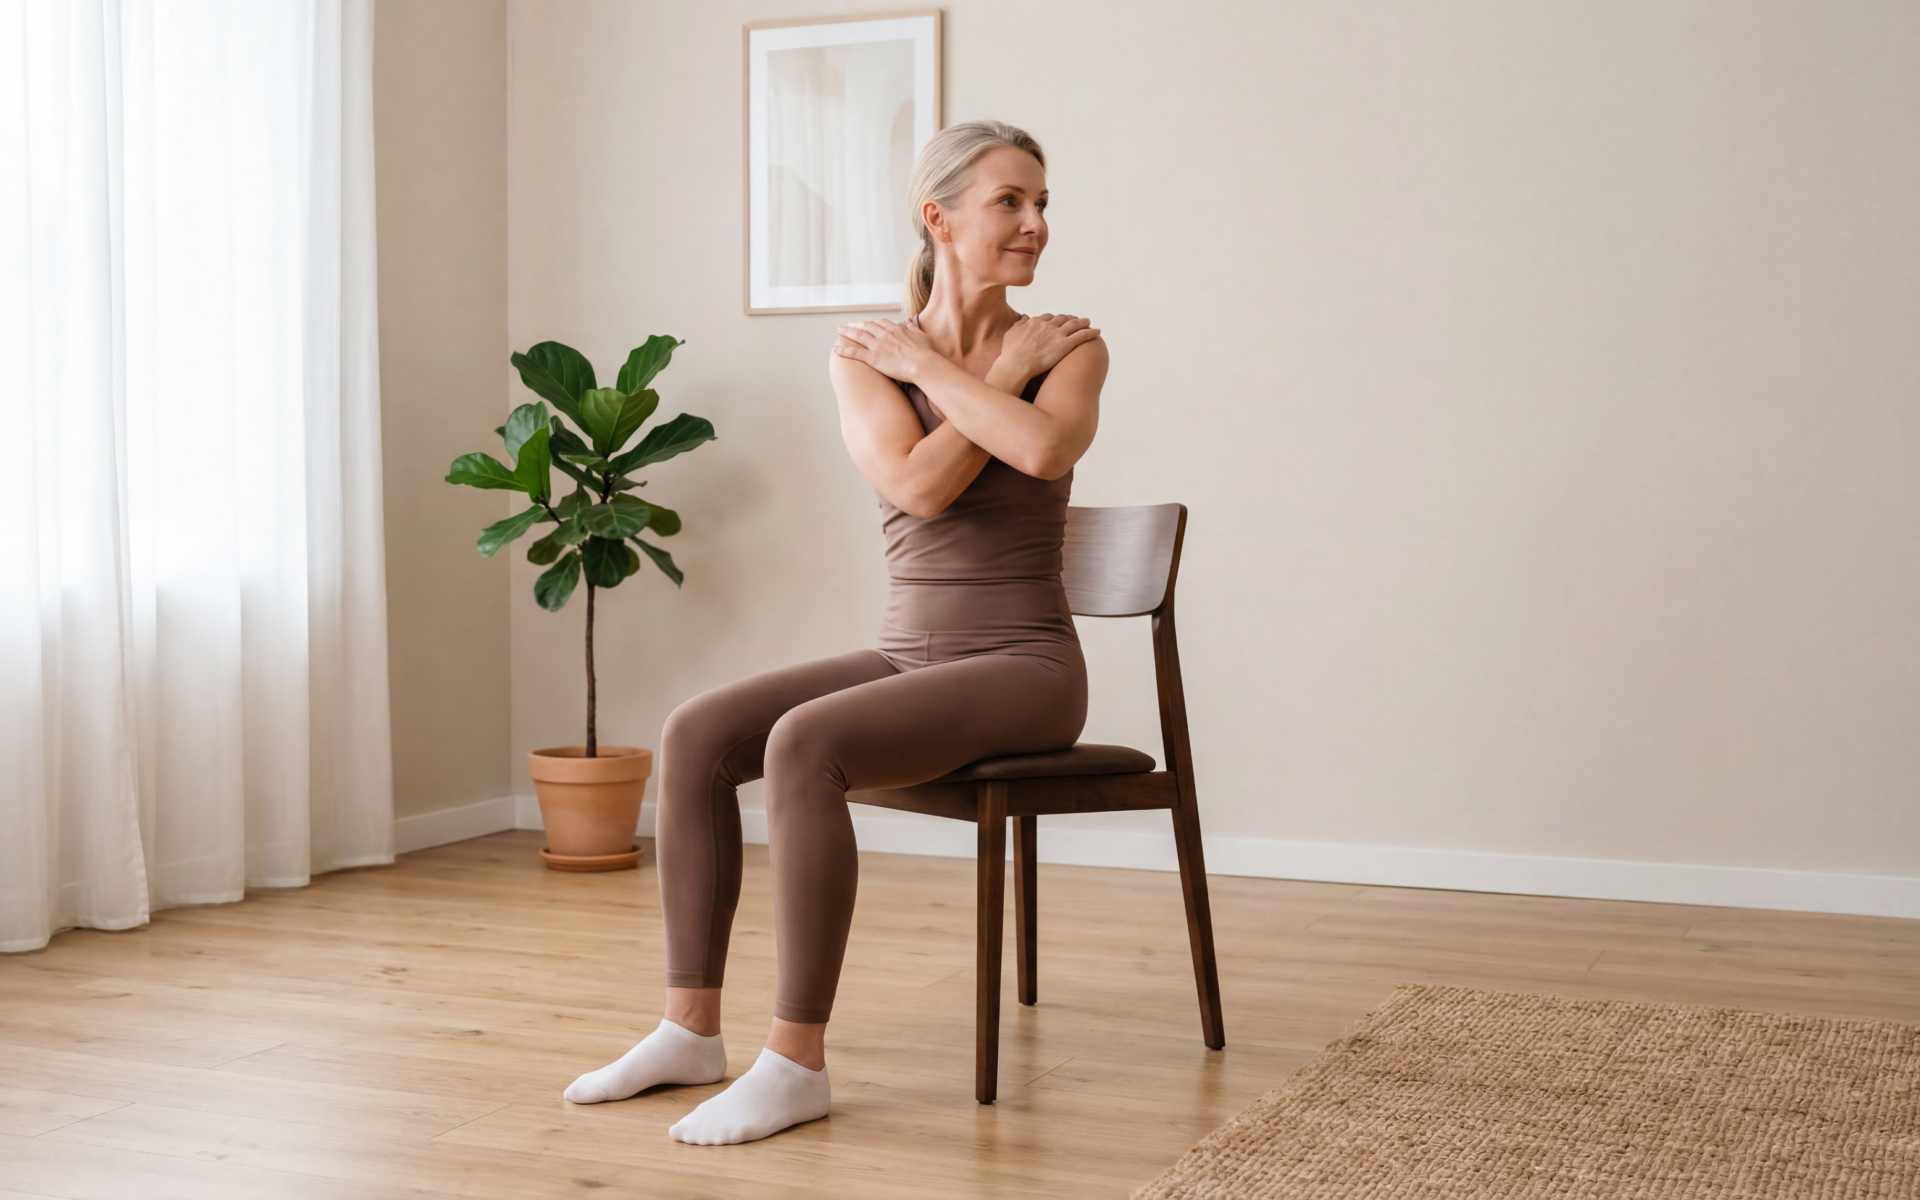
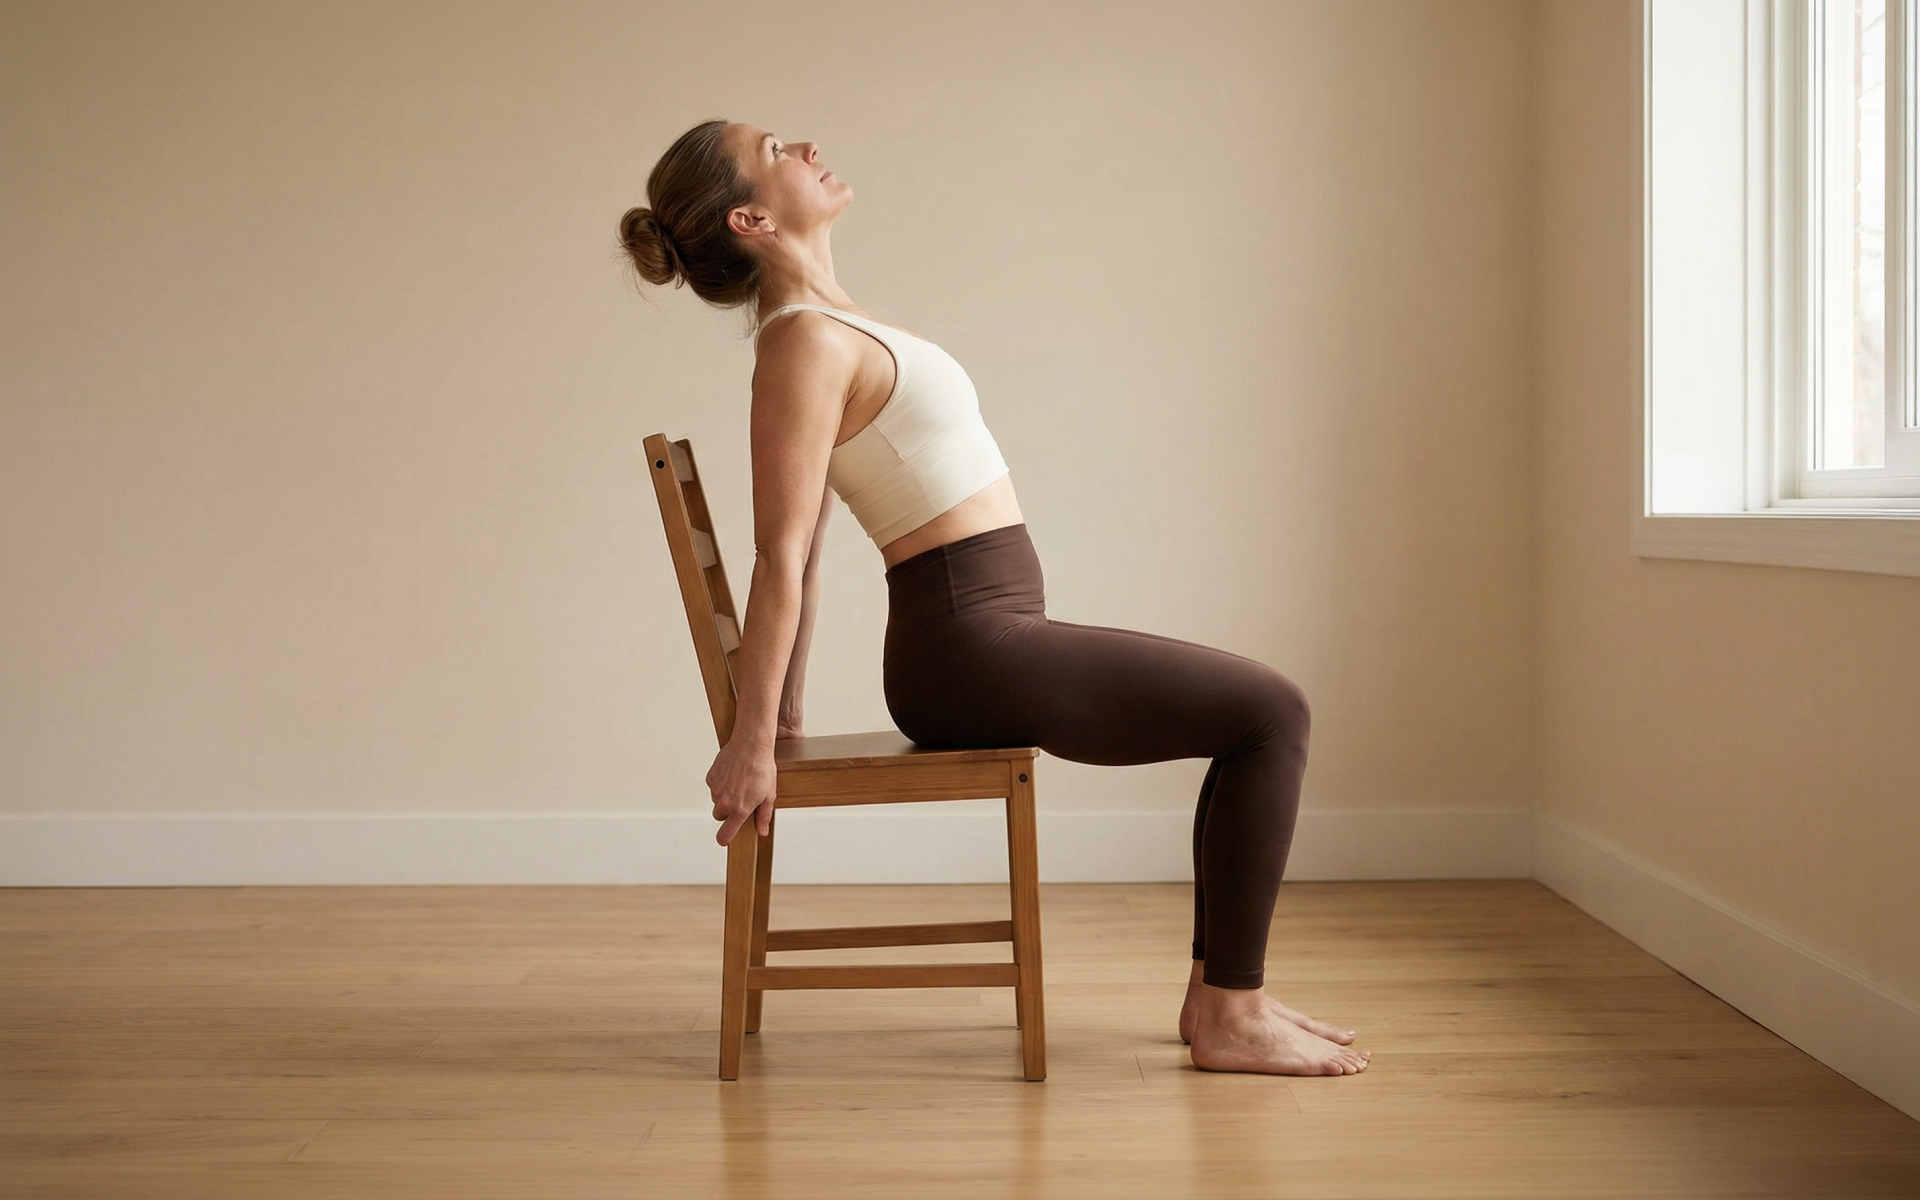
Chair Yoga Dip with Bent Knees
- Sit on the edge of a chair or similar surface.
- Place your hands on the edge of the chair, fingers pointing down.
- Sit up straight, keeping your belly tight and shoulders back.
- Scoot forward so only the palms of your hands and the edge of your butt are touching the chair.
- Push down with your hands to lift your butt off the chair.
- Bend your elbows and lower your body until you almost touch the floor.
- Keep your back close to the chair and your elbows pointing up and back.
- Push back up using your arms and chest muscles, but don’t sit back on the chair.
- Repeat.
Chair Dip with Straight Legs
- Sit on the edge of a chair, hands on the sides.
- Lean forward and put your weight on your hands.
- Straighten your legs and lift your toes so you’re balancing on your heels.
- Bend your elbows and lower your body until you almost touch the floor.
- Keep your legs straight and heels on the ground.
- Push back up using your arms and chest until you’re almost sitting on the chair again.
- Repeat.
Chair Dips with Two Benches
- Put two chairs facing each other, about 3 feet apart.
- Sit on one chair, holding the edges.
- Put your heels on the edge of the other chair.
- Lean forward until your butt is off the chair, then lower yourself by bending your elbows.
- Push yourself back up until your arms are straight.
- Repeat slowly and with control.
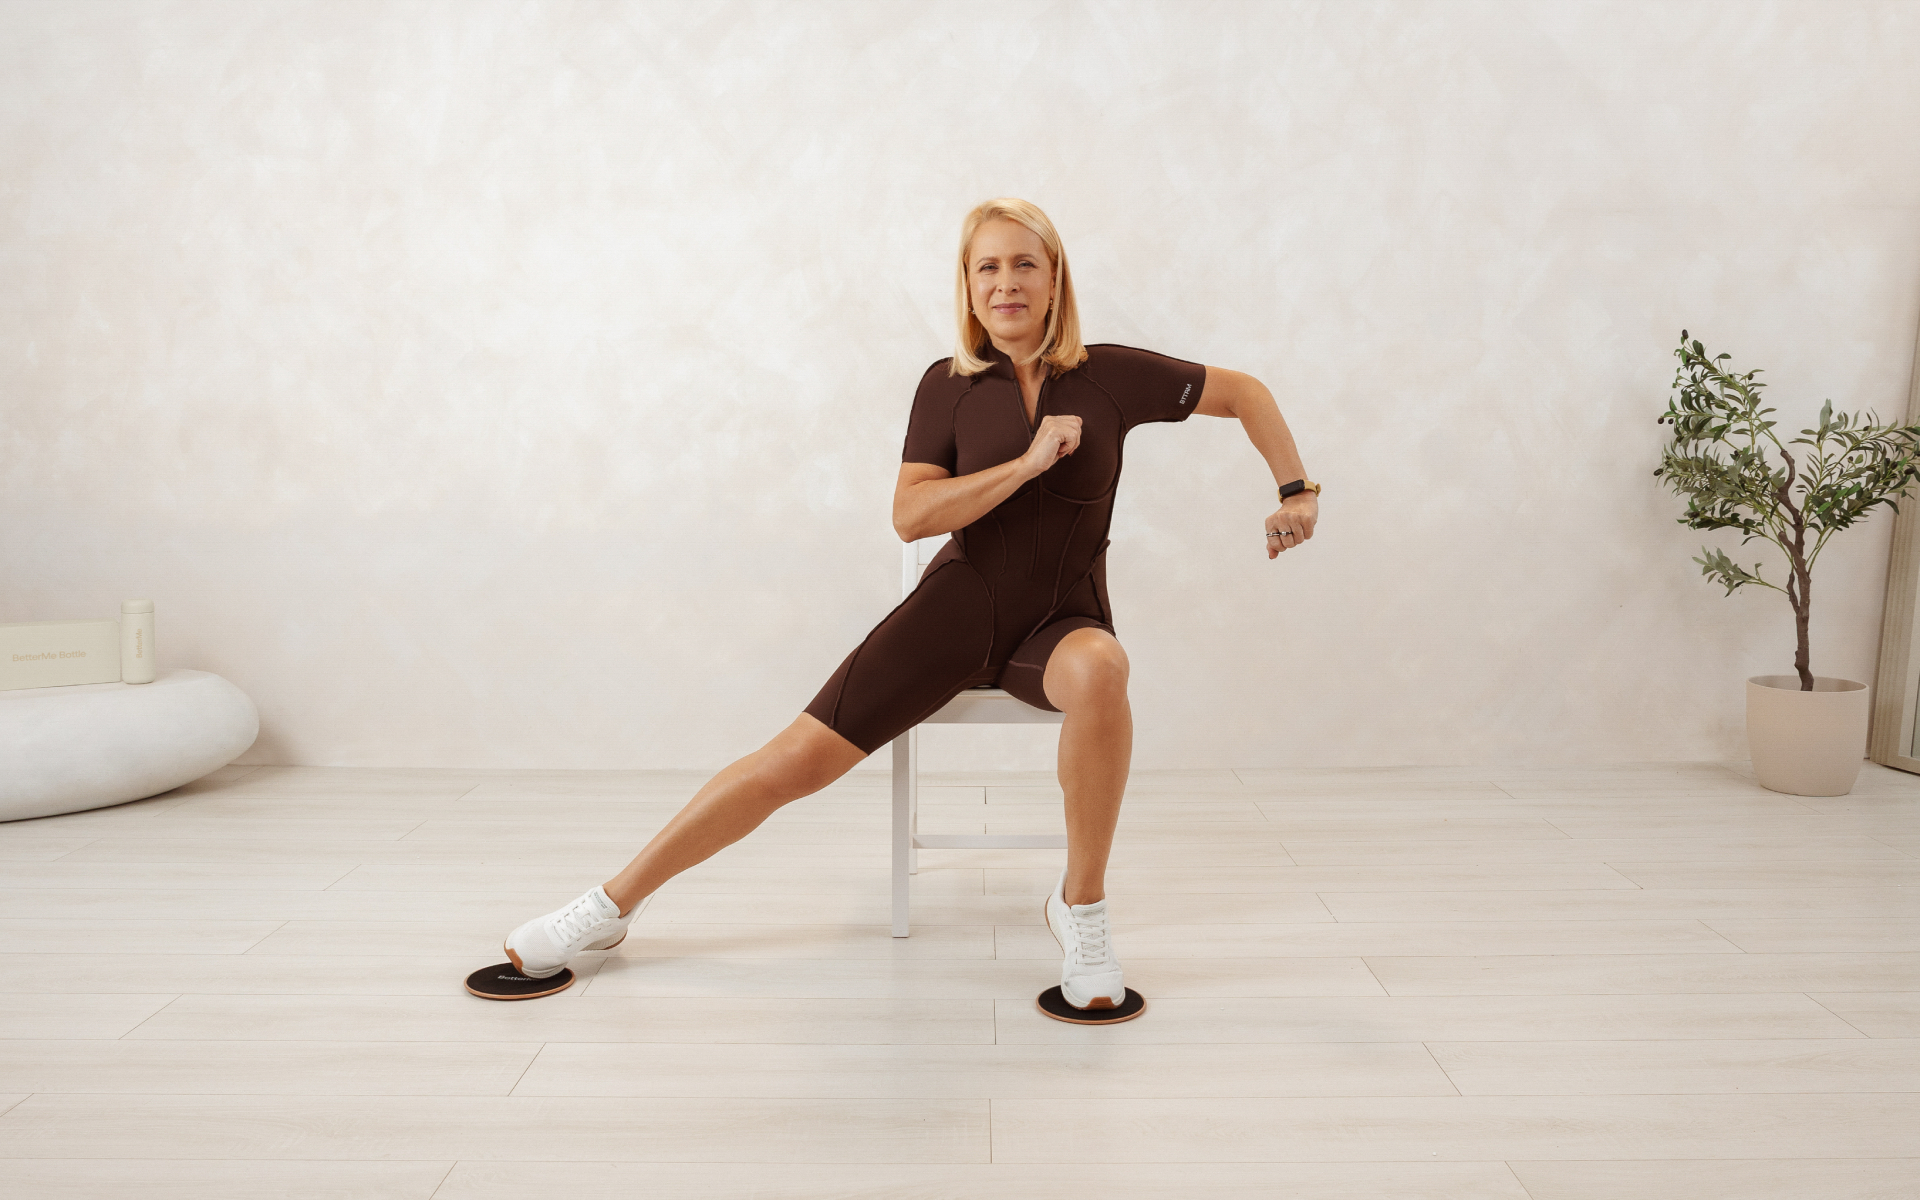
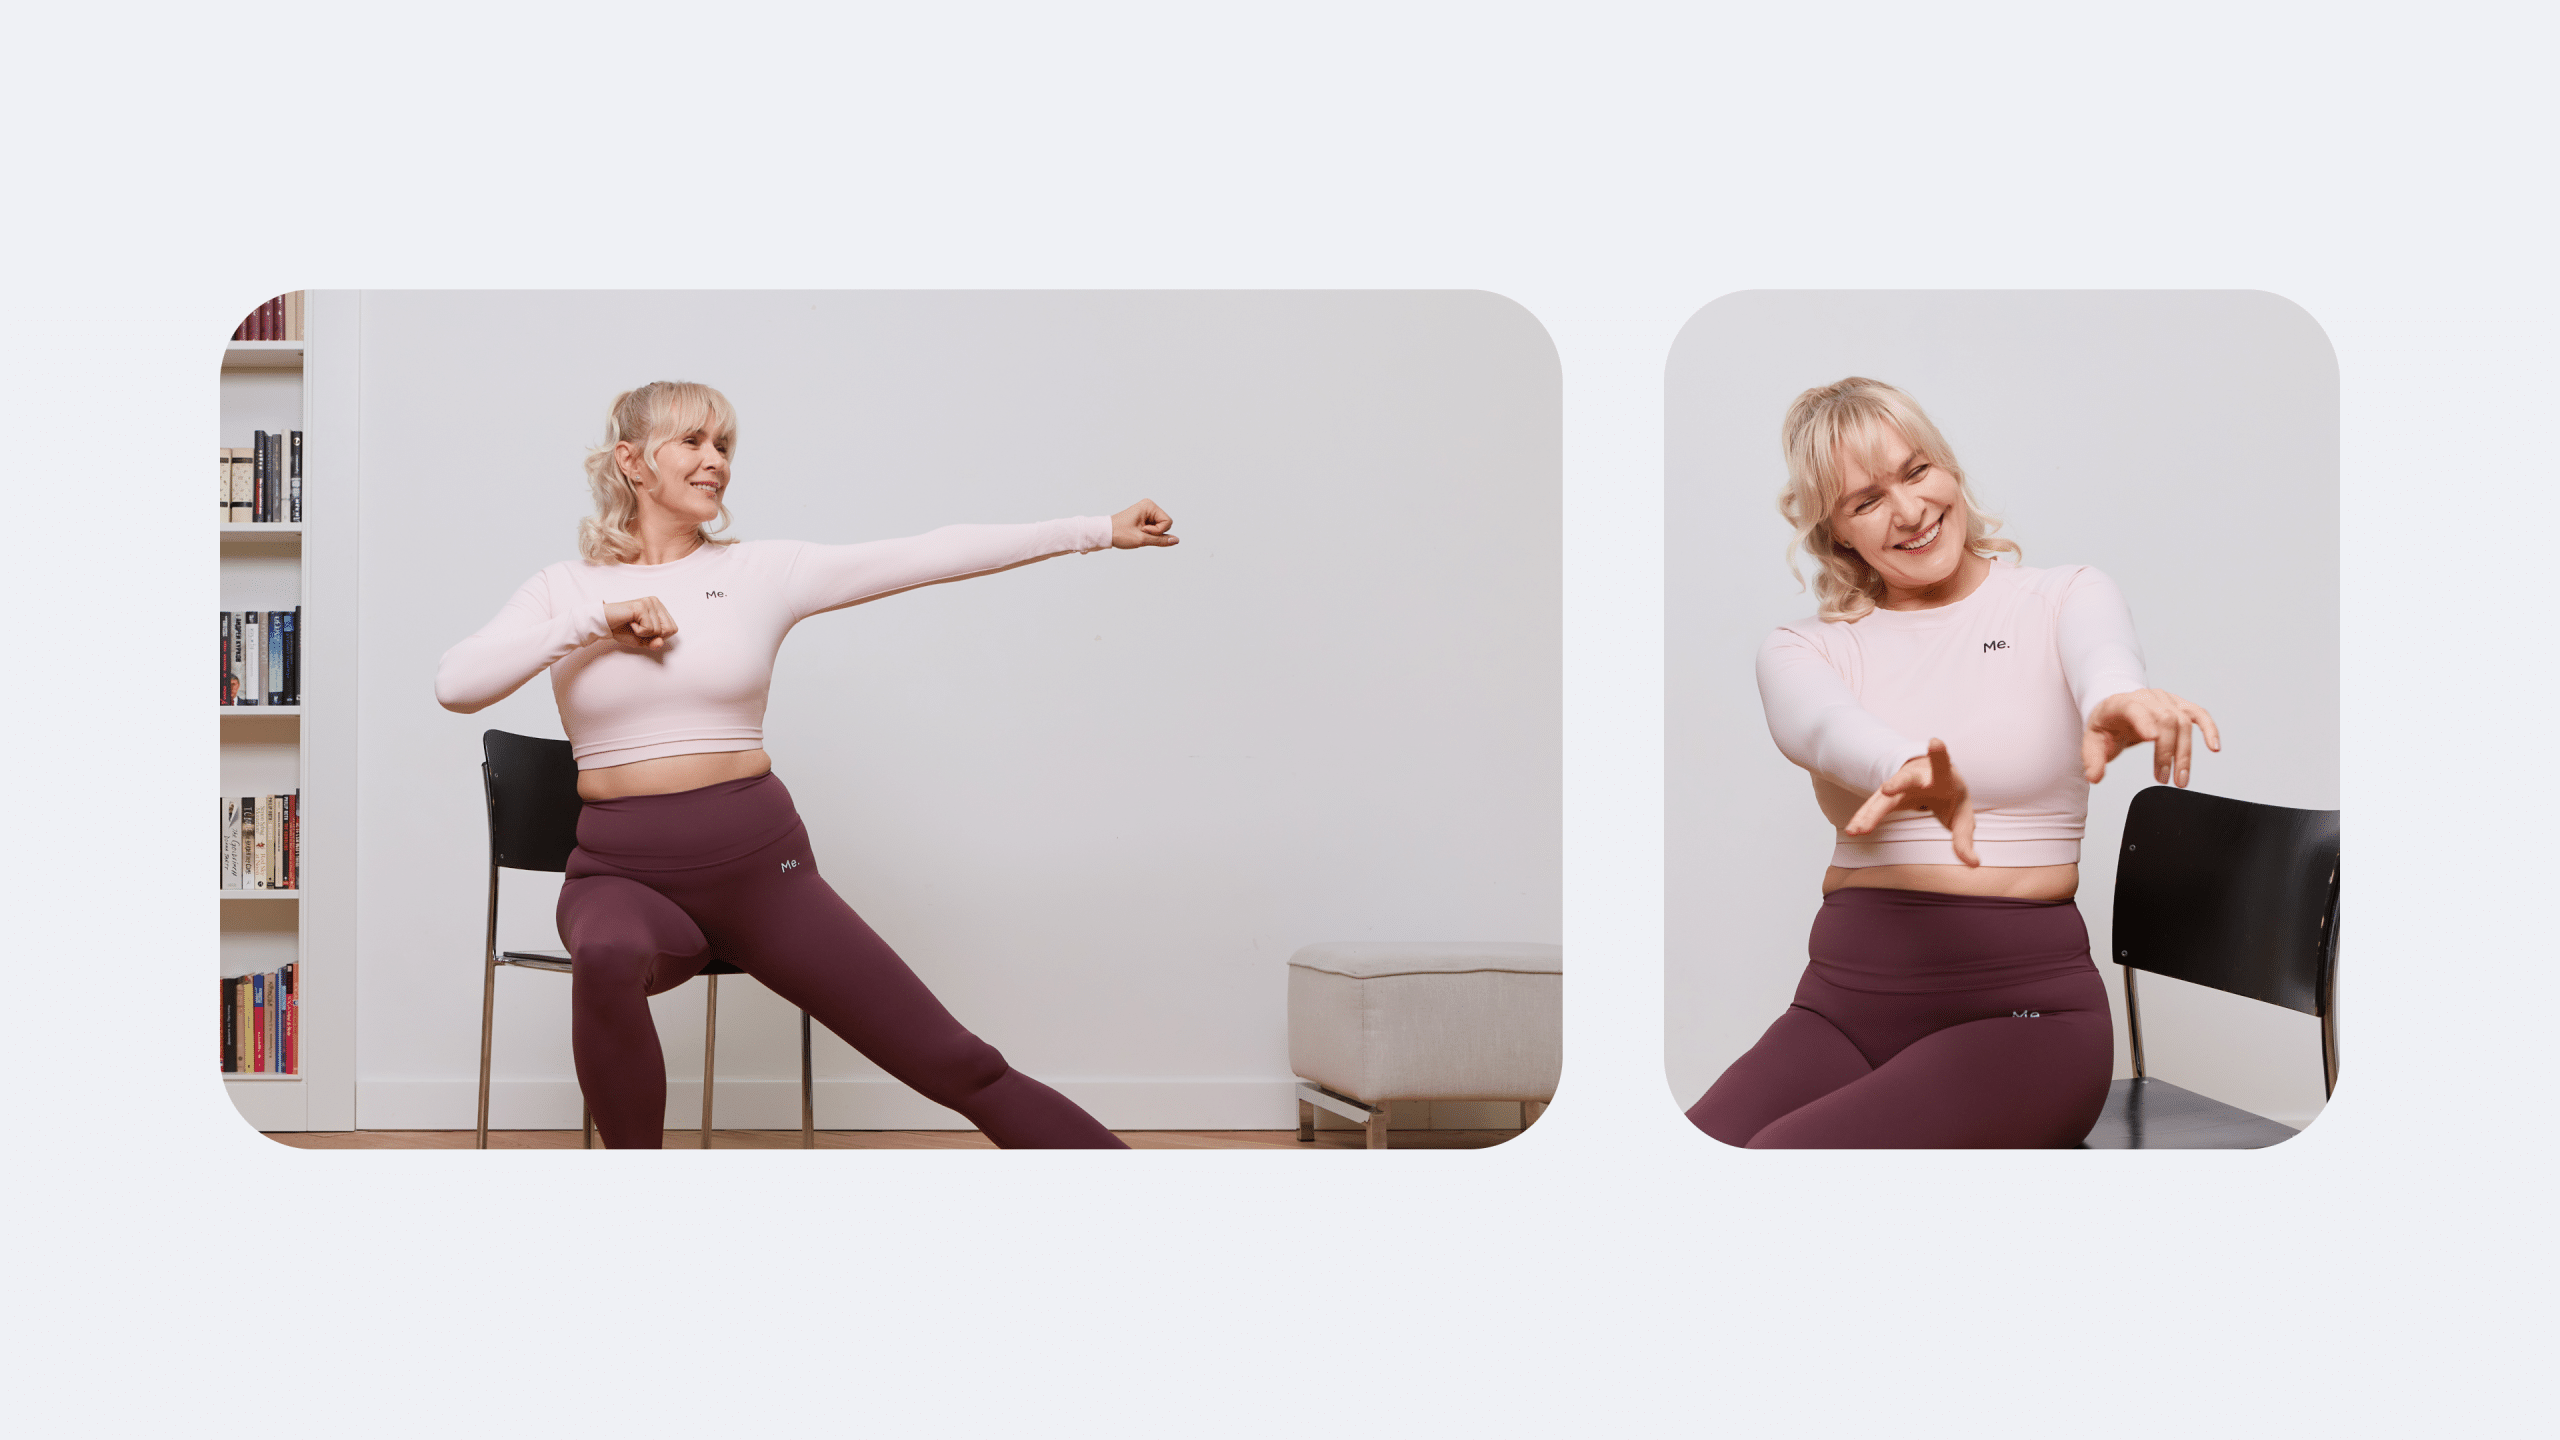
Seated Skater Exercise
- Sit up straight with both arms stretched out in front of you.
- Extend your right leg out straight.
- Reach down with your right arm and try to touch your left foot (or reach as far as possible).
- At the same time, extend your left arm out behind you.
- Return to the starting position with both feet on the floor and arms stretched out.
- Repeat the same steps with your left leg and right arm.
Tricep Dip with Rings
- Grab the rails or rings with your hands, palms facing down, arms straight.
- Tighten your stomach muscles and lift your feet, putting your weight on your arms.
- Bend your knees so your feet are in the air.
- Slowly bend your elbows and lower your body as far as possible without hurting your shoulders.
- Hold this position for a second or two.
- Push yourself back up until your arms are straight again.
- Finish by straightening your legs and standing up.
Chair dips are a beginner-oriented version of full-bodyweight dips that are performed by using benches or parallel bars at the gym. But if you want to do this exercise at home because you can’t go to the gym, you can advance to chair dips or leg bench dips by adding some resistance. For instance, you can start wearing a weighted vest to make this exercise more challenging. Or you can place dumbbells, sandbags, or weight plates along the crease of your hips.
If you are looking for yoga chair exercises for seniors, you should definitely try the chair dips beginner version. When you feel like your body can take more strain, you should try the variations discussed above. Remember that you have to prioritize your body through and through. If you feel like you are exhausted and may hurt yourself, quit right away and move back to the previous progression! We all progress at different rates and it is important to do what works for you to avoid injury.
Read more: 21 Day Chair Yoga: Reasons To Add This Challenge To Your Routine
How to Properly Do a Chair Dip?
Every exercise has some rules, regardless of its level of ease. You should be aware of some important tips and techniques to make the most out of them. This is especially relevant in the case of chair exercises for seniors, as one wrong move can result in serious injuries or muscle strain.
The following are some tips to be mindful of when doing chair dips:
- Keep your core tight and engaged to maintain a neutral spine, and avoid hunching your shoulders.
- Keep your elbows straight behind you, not spreading those outwards.
- Lean your back against the chair’s edge. Don’t reach your arms way back with your butt far away from the chair. This way, you won’t irritate your shoulders.
- Keep your body straight without leaning forward. This works on your triceps more than your chest.
- When you push yourself back up, make sure you are using your arms and not your feet. This way, you’ll be working the right muscles for this exercise.
- If your wrists hurt during this exercise, try to move your hands closer together. Then, turn your hands and wrists slightly outwards. Do these until you find a comfortable position for your hands.
Being aware of these elements ensures that you are performing the exercise in the right form. We strongly suggest that you get help from a certified trainer or a chair yoga app if you are a beginner. A little guidance in the early stages can allow you to feel confident and stronger as you move to the advanced workouts. Proper form is the most important aspect of any exercise movement, so always progress at your own pace.
What are Bent Knee Sit-Ups?
This exercise is also called the hook-lying or crook-lying sit-up. It is a coordination exercise for your abdominal muscles that works in concentric-eccentric patterns against gravity. Your tummy muscles work together to lift your upper body, while your butt and leg muscles keep your legs still and help keep you balanced. This helps to protect your back and ease any stiffness you may feel from sitting, standing, or lying down for too long (3).
Here are the steps to follow when performing a bent knee sit-up:
- Lie on your back on a yoga mat. Bend your knees and put your feet flat on the mat. Pull your belly button in towards your back to tighten your tummy muscles.
- Breathe in through your chest and out through your stomach. When breathing out, try to tighten your stomach, as this will brace your core. Keeping your heels on the floor, slowly lift your head, shoulders, and upper body off the floor at the same time. Stretch your back to sit up straight.
- Breathe in and slowly lower your upper body back down to the floor.
- Do this exercise as many times as you need to.
If you have suffered an injury, you should give your back some time to recover. This exercise can help to ease tightness in your lower back in some situations. Try to breathe normally during these exercises, and don’t force the movements.
Betterme will keep you laser-focused on your weight loss journey! Nutrient-packed meal plans, fat-blasting workouts, galvanizing challenges and much more. Try using the app and see for yourself!
FAQs
How many chair dips a day?
You can start with 3 sets of 8-12 repetitions. Take a rest for about 30 seconds to one minute, and do these 2-3 times a week. You can gradually increase the number of dips as you get stronger. Always listen to your body, and don’t push yourself too hard.
What happens if I do dips every day?
You may notice a reduction in body fat and an increase in lean muscle mass as long as you are combining this with proper eating habits for your body. But you should know that performing dips daily without rest can cause muscle injuries. That said, take some time to relax your muscles and allow them to heal.
Do chair dips burn fat?
Yes, chair dips can burn fat but you should combine these with other exercises and a healthy diet to ensure you are adopting a wholesome approach to fat loss. Weight loss occurs when you are eating less calories than you are burning in a day. No exercise will be able to “out work” a poor diet.
Do chair dips help lose arm fat?
Tricep dips, an easy exercise you can do with a chair, can help people of all ages reduce underarm fat. This exercise works the back of your arms, which can make them stronger and tone the underarm area.This can then give you the appearance of tighter arms and potentially reduce the look of underarm fat.
The Bottom Line
If you have never done physical exercises before, you can start with chair dips. A chair yoga dip with bent knees can help you kickstart your workout journey and achieve some notable milestones as you advance more. This exercise can stress your shoulder and elbow joints, so be careful if you are feeling any pain or discomfort. If you have joint pain, you may add a Pilates chair exercise to keep it gentle and engaging. But if you have shoulder problems, you may want to skip chair dips altogether.
Start by doing 3 sets of 10 repetitions. As you get stronger over a few weeks, gradually do more sets and repetitions. This exercise is considered quite flexible, meaning it can be simplified or intensified as desired. Also, note that chair dips aren’t the only exercise that targets the upper arms. You can also include exercises like a triangle push-up, overhead triceps extension, and chair windmill exercise.
You should curate a structured routine that includes other exercises like cardio and strength training to keep your entire body functional! If weight loss is your goal, make sure you are eating the right amount of calories per day and not going over your total calorie limit.
Also make sure that the chair or bench that you are using is capable of holding your body weight at the end of the chair. This exercise is designed to use the edge of the seat of a chair and if the chair is not sturdy or strong enough it can fall onto you.
DISCLAIMER:
This article is intended for general informational purposes only and does not serve to address individual circumstances. It is not a substitute for professional advice or help and should not be relied on for making any kind of decision-making. Any action taken as a direct or indirect result of the information in this article is entirely at your own risk and is your sole responsibility.
BetterMe, its content staff, and its medical advisors accept no responsibility for inaccuracies, errors, misstatements, inconsistencies, or omissions and specifically disclaim any liability, loss or risk, personal, professional or otherwise, which may be incurred as a consequence, directly or indirectly, of the use and/or application of any content.
You should always seek the advice of your physician or other qualified health provider with any questions you may have regarding a medical condition or your specific situation. Never disregard professional medical advice or delay seeking it because of BetterMe content. If you suspect or think you may have a medical emergency, call your doctor.
SOURCES:
- Anatomy, Shoulder and Upper Limb, Triceps Muscle (2023, ncbi.nlm.nih.gov)
- Bench, Bar, and Ring Dips: Do Kinematics and Muscle Activity Differ? (2022, ncbi.nlm.nih.gov)
- Effect of Traditional vs. Modified Bent-Knee Sit-Up on Abdominal and Hip Flexor Muscle Electromyographic Activity (2015, pubmed.ncbi.nlm.nih.gov)
- Functions of the Triceps Brachii in Humans: A Review (2018, ncbi.nlm.nih.gov)
- Glenohumeral Extension and the Dip: Considerations for the Strength and Conditioning Professional (2021, researchgate.net)