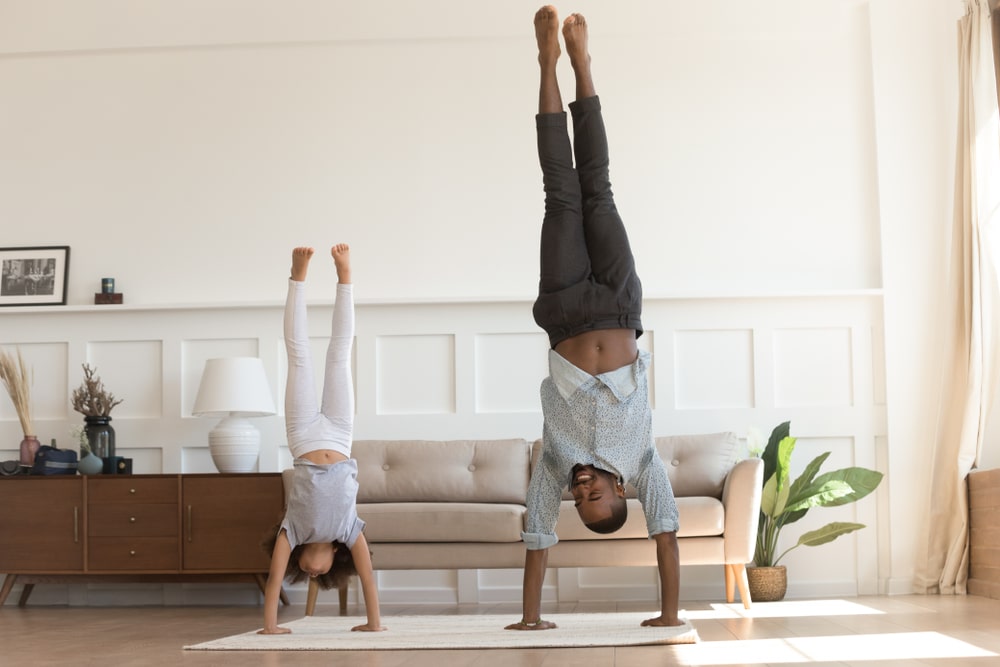
By now you may have seen the numerous handstand challenges on TikTok and are perhaps considering trying one. Before you do, you should learn proper handstand form and avoid injury. Even if you enjoy hanging upside down you still better learn correct form, as there is a technique. Join us, as we explore how to master proper handstand form and drop a few tips to help you along the way.
What Does Handstand Mean?
Perhaps this term already gives you a general idea of what it involves. A handstand is the act of supporting your entire body on your hands while upside-down (6). People often mistake this with a headstand, but they are different exercises.
Unlike a headstand, a handstand requires that you balance all your weight on your two hands. Because of this, it is more challenging than a headstand.
What Muscles Do Handstands Work?
The handstand targets your delts, arms, core, lats, traps, triceps, hamstrings, and rhomboids (6). It is an effective whole-body workout, as it targets most of your muscle groups. You can consider adding this to your workout plan if you need an all-rounded movement for your shoulders, arms, core, and other body muscles.
Can Anybody Do A Handstand?
Sometimes your confidence and will are not enough to make you perform an exercise, like in this case. Even if you are 1000% confident and determined to nail a freestanding handstand you may end up being disappointed to find out that you can not do it.
Know that not everyone has the pass to go to a handstand. Here are some people who unfortunately cannot or should first check in with their doctor before trying a handstand:
-
People With High Blood Pressure, Glaucoma, And Other Circulatory Issues
A handstand may not be ideal for such individuals because the head is lower than the heart, which may increase intraocular pressure (IOP) (7). Such people are advised against movements that put them in upside-down positions, such as handstands and head-down yoga exercises (7).
-
People With Shoulder Problems
Shoulder mobility is paramount when getting into a handstand. If you have problems with your shoulders you may have to wait until you are well to try this.
-
People With Several Conditions
Evidence also suggests that being in an upside-down position when in a handstand or headstand could be hazardous for people with specific conditions. They include acute ear infections of the ear or throat, detached retina, epilepsy, seizures, brain disorders or other brain injuries, chronic neck problems or whiplash, osteoporosis, and obesity (1).
This exercise is also not recommended for pregnant women or individuals with conditions requiring aspirin therapy (1). Experts also suggest individuals with spinal problems avoid the exercise as it also bears the risk of damaging the upper spine when done for too long (1).
Read More: Fitness Lifestyle: The Most Effective Ways To Make It Yours
What Can Handstands Do For Your Body?
Surprisingly, being in an upside position has more benefits than you think. Some of them include:
-
Thorough Full Body Workout
A handstand targets most muscle groups, such as your core, shoulders, back, arms, and lats. When targeting all these muscle groups, the exercise also helps work them. For example, it helps build back, core, and shoulder strength.
-
Improves Blood Circulation
You may have heard talk about blood circulation while in an upside-down position. Perhaps the most common one is that being in an inverted position brings more blood to your brain.
Such talk has led people to choose not to try anything that has your body in an upside-down position. However, evidence has shown that it could be advantageous as the upside-down position of a handstand increases blood flow to the brain (6). As a result, this may improve the functioning of the cardiovascular and lymphatic systems.

-
Excellent Challenge
If you love to challenge yourself, a handstand can be a great way to do that. It requires a lot of training, patience, and determination, all of which challenge your mental and physical coordination and endurance. Just be sure to get your trainer’s green light to try this challenge as it is not suitable for some people.
-
Great Way To Build Strength And Balance
Performing a freestanding handstand is another excellent way to build strength and balance. You not only need shoulder and core strength to ace it, but also balance. Again, the developed core, shoulder, and forearm strength helps control balance.
-
Promote Cerebrovascular Elasticity Training And Delayed Aging Signs
A 2022 study discovered that long-term passive handstand exercise could promote cerebrovascular elasticity training and delay aging signs (2). Cerebrovascular elasticity has been closely related to intracranial vascular health, whose main risk factor is aging (2). Researchers believe a passive handstand can promote cerebrovascular elasticity training, preventing and treating cerebral atherosclerosis and brain ischemia (2).
How Long Does It Take To Master The Handstand?
There is no standard answer because it varies from person to person. Some people get it almost right away. However, overall mastery requires practice and mental discipline.
As much as you keep trying day and night, you must also remember to train your mind to cooperate with your movements. Mental and physical cooperation will have you nailing this in no time.
Take it easy on yourself even if you do not master it after months of trying. Yes, it can be frustrating, but be kind to yourself and your body. Do not push it to limit where it will respond negatively. Remember that whether it takes a year or more, the idea is to focus on the correct form, not how long it takes you to master it.
If you wish to cinch your waist, tone up your bat wings, blast away the muffin top – our fitness app was created to cater to all your needs! BetterMe won’t give excess weight a chance!

The Proper Handstand Form
There are several ways you can get into a handstand stance. For example, you could start on all fours, in a lunge, or a downward-facing dog. Regardless of how you start, the fact is that the other steps should get you in the proper yoga handstand form. Here are the steps to take when you start a gymnastic hold in the downward facing dog position (6):
Step 1: Get In A Downward Facing Dog Stance
Stand with your back facing the wall and get into a downward-facing dog position. Start on all fours, then lift your knees. Extend and lengthen your spine when pressing through the palms of your hands and the balls of your feet.
Make sure that when in this downward-facing dog position, your feet are next to the wall.
Step 2: Walk Your Feet Up The Wall
Slowly walk your feet up the wall behind you while keeping your legs bent. As you do this, try to press more weight into your hands and the foot on the wall (6).
Walk up the wall slowly to help balance and avoid falling. If you have not fallen by now, you are doing something right, so keep going. Enlist the help of your trainer or friends if your arms are overwhelmed by the weight. Again, remember to engage your core and shoulder muscles as you walk up the wall.
Step 3: Walk And Maintain The Correct Form
One of the major mistakes most beginners make when getting into a handstand is in concentrating on walking up the wall fast. As a result, they fail to maintain the correct form, which may involve engaging the core (6). It may also require you to keep your knees bent until your legs are fully stretched.
Let us remind you that it is not about how fast you get there, but how you get there. Try to maintain the required form of every muscle group. It may be challenging to get everything in order, and there are people who even quiver to the point of falling into the starting stance.
Step 4: Stretch One Leg Above Your Body
Next, choose a leg, then lift it towards the ceiling. Be sure to breathe in as you lift it for a more controlled lift, then breathe out when in position. As you lift, rotate your legs slightly inward to help maintain your spine in a neutral position.
Keep the foot of the lifted leg pointed or flexed. The other leg should be on the wall. Try to find balance as you shift your weight to determine your center of gravity.

Step 5: Extend Both Legs
Now bring the leg on the wall up to meet the extended leg. Keep your core engaged throughout and your spine in a vertical position (6). If your arms or body feels wobbly, slowly return the feet to the wall.
Alternatively, you could ask your trainer or friend to help you align your body until you find balance. When ready, have them let go and hold the handstand. Keep engaging your core and hold in this position until you are ready to rest. Then, slowly and gently lower your feet to the wall and walk your way back to the floor. Repeat two to three times.
Read More: Functional Fitness: What It Is And Why You Need To Practice It
Handstand Progressions/Variations To Try
If you are looking for a further challenging variation, you can try a handstand progression such as the press handstands. But these are only recommended for people in the advanced fitness level. The press handstands activate your core, lower back, and hamstrings (4). To perform them (4):
- Get on your fours with your toes and knees flexed and in contact with the floor. Position your hips over your knees and hands underneath your shoulders.
- Rotate your shoulders outward to engage your upper back and keep your chin tucked throughout the movement.
- Stretch your arms and legs so you are in an inverted V position. Your pelvis should remain tucked, ribs kept down, and core fully engaged.
- Distribute the weight on your hands evenly and grip the floor using your hands to increase stability and enhance the shoulder position. This marks the starting position of all reps.
- Press your hands through the floor, move your upper body forward, and shift over your hands so that your body weight shifts from your lower body to your hands.
- Slightly round your thoracic spine and use your arms and core to help lift your legs off the ground.
- Keep your arms stretched, and then slowly lift your legs until they are over your hands.
- By now you will be in a full-handstand position. Your legs should be fully stretched out, shoulders over your wrists, and hips over your shoulders.
- Squeeze your legs together and clench your glutes and quads. Keep your chin tucked, ears aligned with your upper arms, ribs kept down, and pelvis slightly tucked. Similarly, let your body form a straight line.
- Hold the handstand for a few seconds or breaths or as desired before slowly lowering to repeat.

Handstand Tips For Beginners
For safety and fast mastery of the handstand, there are several tips that fitness experts recommend. They will make practicing this easy and safe. Some of these recommended tips include:
-
Using A Wall
For starters, using a wall is recommended for added assurance and safety. So, start at a wall and then “climb up” using your feet until you can push off the wall. It would be best to do this in the presence of your trainer. (5).
Additionally, extra support and guidance go a long way in boosting your determination and morale in mastering the exercise. As you improve, your trainer can recommend turning your body away from the wall to initiate the handstand without support.
The wall handstand is an excellent way of working your way up to a freestanding handstand (5). That said, if you do not know where to start, a wall handstand seems like a perfect idea. Here are the steps again with more detail (5):
- Face with your back to the wall and then get on all fours. Position your hips over your knees, hands underneath your shoulders, and the soles of your feet firmly pressed against a sturdy wall.
- Grip the floor with your hands and rotate your shoulders outward to engage your lats. Similarly, engage your shoulders, hips, and core.
- Push your hips into the air and slowly walk your feet up the wall.
- Walk your hands towards the wall as you also walk your feet up. Continue to do this until your legs are straight and hands are directly beneath your shoulders.
- To get in a handstand position, your shoulders must be over your wrist and hips over your shoulders. Also, your legs must be fully extended, so maintain all these.
- Push your hands through the ground and elevate your shoulder blades to create a stable upper body stance. Rotate your shoulders outward to engage your upper back. Keep your chin tucked in throughout the movement with ears aligned with your upper arms.
- Clench your glutes and also squeeze your quads and legs together. Remember to engage your core muscles and keep your ribs down and pelvis slightly tucked.
- Hold this position for a few seconds and maintain a strong core and tension throughout your body.
- Slowly walk your hands forward as you also walk your feet down the wall to return to the starting position.
- Repeat as desired or instructed.
BetterMe is your fast-track ticket to a long-lasting weight loss! Tailor your fitness journey and maximize your results with just a couple of swipes!
-
Warming Up
Unfortunately, some people do not see the need for a warm-up for this exercise. But you should warm up, especially your hands and wrists, because they receive a significant amount of stress. Consider warm-up exercises, such as the forward and back wrist stretch, wrist rotations, hooked stretch, wrist-strengthener, and the windshield wiper wrist movement (3).
-
Finding Some Cushioning
You may want to find some cushioning as a safety precaution and place them around you. Get some cushions or folded blankets and place them around you to provide a soft landing in case you lose balance and fall.
-
Getting Help
Beginners are advised to enlist the friend of a trainer, friend, or yogi when learning how to do a handstand. They will help you align your body and offer support if you lose your balance (5). They could also be a motivating factor that helps you stay on track despite failing countless times.
-
Being Patient
It may take you longer than expected to master a handstand. But we urge you to be patient and always listen to your body. Please do not push it to unbearable limits because this increases injury risk. Instead, keep practicing, even if it takes months. You will eventually learn it and will be glad you did it without putting yourself at injury risk.
-
Walk Your Way Up
You cannot master the handstand overnight. Training for safety, strength, balance, and endurance will take a while. It would be best to start by straining for safety, which means mastering the correct form. Next, work on your strength, followed by balance (5). With time, work on your endurance to determine how long you can hold in a handstand position.
The Bottom Line
A handstand is an exercise that has you in an upside down position. It helps build core and shoulder strength, provides a full-body workout, improves blood circulation, and increases balance.
However, you must learn the proper handstand form to reap any of these benefits and hold your handstand like a gymnast. Additionally, be sure to take note of the handstand tips for your safety.
DISCLAIMER:
This article is intended for general informational purposes only and does not serve to address individual circumstances. It is not a substitute for professional advice or help and should not be relied on for making any kind of decision-making. Any action taken as a direct or indirect result of the information in this article is entirely at your own risk and is your sole responsibility.
BetterMe, its content staff, and its medical advisors accept no responsibility for inaccuracies, errors, misstatements, inconsistencies, or omissions and specifically disclaim any liability, loss or risk, personal, professional or otherwise, which may be incurred as a consequence, directly or indirectly, of the use and/or application of any content.
You should always seek the advice of your physician or other qualified health provider with any questions you may have regarding a medical condition or your specific situation. Never disregard professional medical advice or delay seeking it because of BetterMe content. If you suspect or think you may have a medical emergency, call your doctor.
SOURCES:
- . . . But Medical Experts Remain Unmoved (2001, washingtonpost.com)
- Case Report: Passive Handstand Promotes Cerebrovascular Elasticity Training and Helps Delay the Signs of Aging: A 40-Year Follow-Up Investigation (2022, ncbi.nlm.nih.gov)
- How to stretch your hands and wrists (2019, medicalnewstoday.com)
- Press Handstand Guide: How to Master Press Handstands (2021, masterclass.com)
- Wall Handstand Exercise Guide: How to Master Wall Handstands (2021, masterclass.com)
- Workout Series: How to Master the Handstand (2014, youtube.com)
- Yoga can be dangerous—glaucomatous visual field defect worsening due to postural yoga (2007, ncbi.nlm.nih.gov)